Deserialization tutorial
In this quick tutorial, we’ll see how to deserialize a JSON document with ArduinoJson 7. As a reminder, deserialization turns a JSON input into objects from which we can extract the values. This tutorial requires a basic understanding of Arduino programming and a vague knowledge of JSON.
It doesn’t matter if you’re using an Arduino UNO, an ESP8266, or an ESP32; the code shown here works on any device.
The JSON input
We’ll write a program that extracts and prints all the values from the following JSON document:
{
  "sensor": "gps",
  "time": 1351824120,
  "data": [
    48.756080,
    2.302038
  ]
}
This JSON document contains three root members: a string named sensor, a number named time, and an array named data.
We’ll store the input in the following variable:
const char* input = "{\"sensor\":\"gps\",\"time\":1351824120,\"data\":[48.756080,2.302038]}";
In this case, the JSON input is hard-coded, but in an actual project, it could come from an HTTP response or a configuration file.
Deserializing the document
I’m assuming you already installed ArduinoJson 7 on your computer. If not, please refer to the installation guide.
First, we must include the library in the program. Add the following line at the top of your program:
#include <ArduinoJson.h>
Then, we must declare a variable to store the deserialized document.
We do that with JsonDocument:
JsonDocument doc;
Then, we must call deserializeJson(), passing the JsonDocument as the first argument and the JSON input as the second.
deserializeJson(doc, input);
Extracting the values
We can now extract the values from the JsonDocument:
const char* sensor = doc["sensor"];
As you can see, we use square brackets to extract a member from a JSON object.
ArduinoJson implicitly converts the value to the expected type.
We can do the same with the timestamp:
long time = doc["time"];
If you don’t like implicit conversions, you can explicitly set the type with as<T>().
Finally, you can chain brackets to extract nested values. For example, we can extract the coordinates like so:
double latitude = doc["data"][0];
double longitude = doc["data"][1];
Here, we are extracting only two values from the data array, but if we were to extract many values, it would be more efficient to save a reference to the array.
JsonArray data = doc["data"];
double latitude = data[0];
double longitude = data[1];
As you can see, we use JsonArray to hold a reference to the array in the JsonDocument. This is more efficient than the previous version because the program only searches the "data" key once.
Also, JsonArray allows you to perform loops, like so:
for (JsonVariant item : data) {

}
As you can see, the item in the for loop is a JsonVariant.
Like JsonArray, it is a reference to a value in the JsonDocument, except JsonArray is limited to arrays, whereas JsonVariant can refer to any value.
It is crucial to understand that neither JsonArray nor JsonVariant holds any data. Instead, they rely on the JsonDocument to have it. Therefore, you must never use a JsonArray or a JsonVariant after the JsonDocument has been destructed
Note that there is a third reference type, JsonObject, similar to JsonArray, but for objects. I invite you to check the documentation to learn more.
Now that we have extracted the values, we can print them to the serial port.
Serial.println(sensor);
Serial.println(time);
Serial.println(latitude, 6);
Serial.println(longitude, 6);
Error handling
If you run this program, you’ll see that is prints the values as expected, but we forgot an essential part: the error handling.
Two kinds of problem can occur in this program: deserialization errors and extraction errors.
Deserialization errors
The first kind of problem is an issue with the deserialization process. For example, the JSON input could be invalid, or we could run out of memory.
We can easily detect these problems by checking the return value of deserializeJson().
DeserializationError error = deserializeJson(doc, input);
As you can see, deserializeJson() returns an error status of type DeserializationError.
We can test if the call failed with if(error):
if (error) {
  Serial.print("deserializeJson() returned ");
  Serial.println(error.c_str());
  return;
}
As you can see, we can call c_str() to get a string representation of the error.
Extraction errors
The second kind of problem is when deserialization succeeds, but the document differs from what the program expects. For example, some fields could be missing or have a different type.
In both cases, ArduinoJson returns a default value that depends on the extracted type.
For example, if the member sensor is missing, or if it’s not a string, ArduinoJson will return a null pointer:
const char* sensor = doc["sensor"]; // default = nullptr
In other words, the variable sensor would be null, so you may need to prepare for this possibility.
Similarly, if the member time is missing, ArduinoJson will return 0:
long time = doc["time"]; // default = 0
You can change the default value using the pipe operator.
For example, you could define a default for sensor like so:
const char* sensor = doc["sensor"] | "unknown";
Now, if sensor is missing, or if it’s not a string, the variable will be assigned to "unknown".
Note that this particular use of the pipe operator is specific to ArduinoJson and only works with JsonDocument and JsonVariant.
The full program
Here is the full program:
#include <ArduinoJson.h>

void setup() {
  // Initialize the serial port
  Serial.begin(9600);
  while (!Serial) continue;

  // {
  //   "sensor": "gps",
  //   "time": 1351824120,
  //   "data": [
  //     48.756080,
  //     2.302038
  //   ]
  // }
  const char* json = "{\"sensor\":\"gps\",\"time\":1351824120,\"data\":[48.756080,2.302038]}";

  DeserializationError error = deserializeJson(doc, json);
  if (error) {
    Serial.print(F("deserializeJson() failed: "));
    Serial.println(error.c_str());
    return;
  }

  // Extract the values
  const char* sensor = doc["sensor"];
  long time = doc["time"];
  double latitude = doc["data"][0];
  double longitude = doc["data"][1];

  // Print the values
  Serial.println(sensor);
  Serial.println(time);
  Serial.println(latitude, 6);
  Serial.println(longitude, 6);
}

void loop() {
  // not used in this tutorial
}
Astute readers will recognize JsonParserExample.ino.
ArduinoJson Assistant
As you saw in this tutorial, a significant part of the code is dedicated to extracting the values from the JsonDocument.
Writing this code can be cumbersome and error-prone, which is why ArduinoJson offers a tool to generate this code for you: the ArduinoJson Assistant.
The ArduinoJson Assistant is an online tool available on arduinojson.org. You can access it by clicking “Assistant” at the top of the page.
The Assistant is composed of three steps.
Step 1
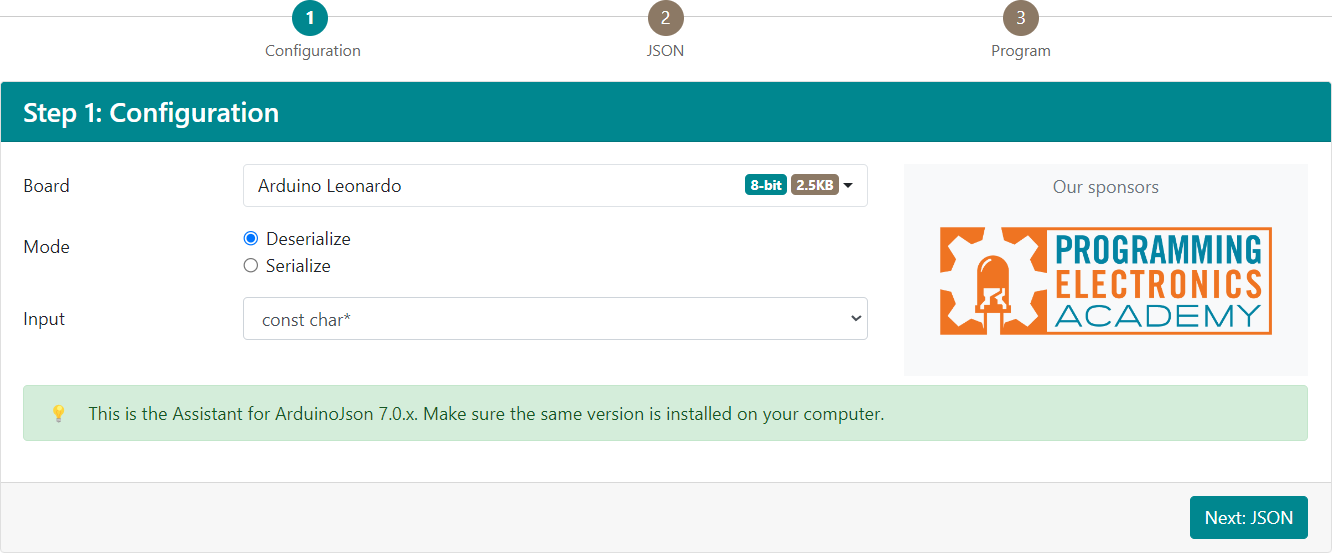
In the first step, you must select:
- the device you’re using (e.g., Arduino UNO, ESP8266, ESP32),
- the mode you want to use: “Deserialize”,
- the input type (e.g.,
const char*).
Step 2
In the second step, you must enter the JSON document you want to deserialize.
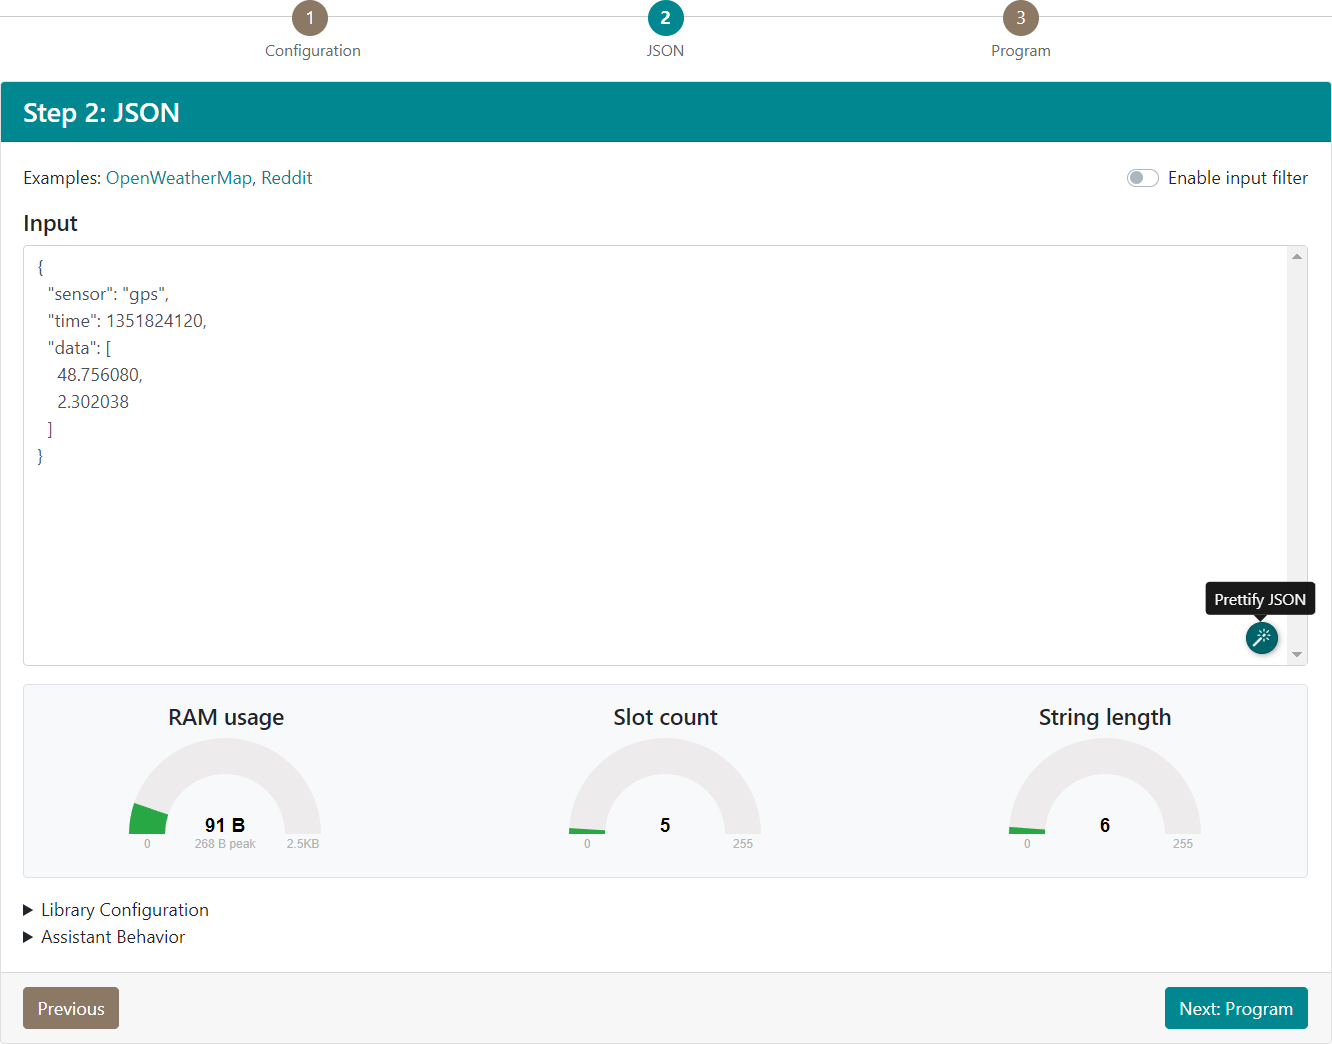
At the bottom, you can see some gages to check that this JSON document fits the hardware and software limitations.
Step 3
The last step contains a sample program that extracts all the values from the JSON document entered in step 2.
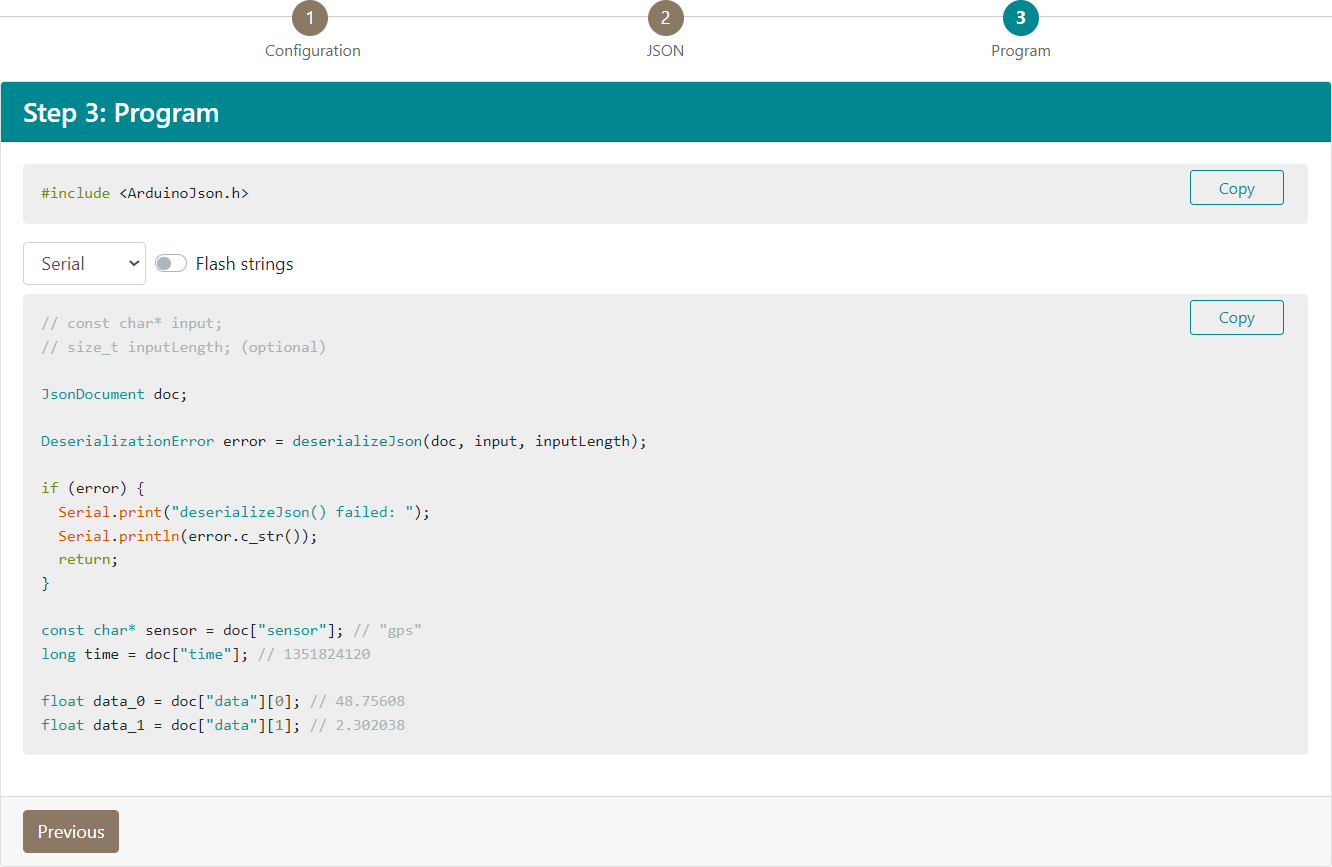
You can copy this program and paste it into your Arduino IDE.
Pretty cool, huh?
If you enjoyed learning from it and want to expand your skills further, consider checking out the full-length guide in my book Mastering ArduinoJson. Not only does it offer an extensive exploration of various aspects of JSON processing with Arduino, but purchasing the book directly supports the development of ArduinoJson and the other Arduino libraries I created.
