How to do serial communication between two boards?
This article shows how you can send JSON documents between two boards connected by a serial link.
In this article, I’ll assume that we use two Arduino Leonardo
s. I’m using this board instead of the Arduino UNO
because it allows using Serial for logging and Serial1 to communicate between the two boards.
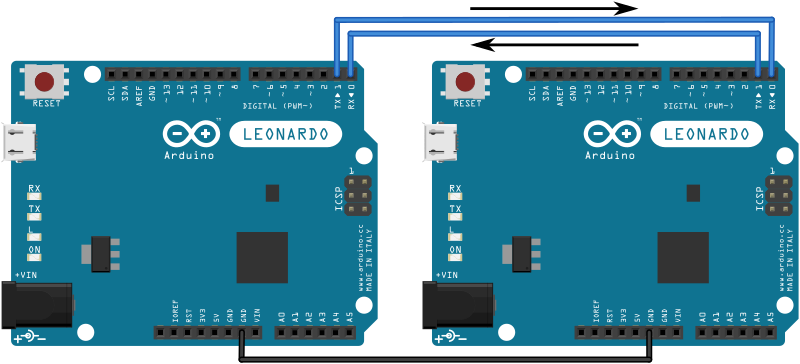
Don’t use SoftwareSerial because it is notoriously unreliable.
Sender program
This program sends {"timestamp":1234,"value":687} every 5 seconds.
#include <ArduinoJson.h>

void setup() {
  // Initialize "debug" serial port
  // The data rate must be much higher than the "link" serial port
  Serial.begin(115200);
  while (!Serial) continue;

  // Initialize the "link" serial port
  // Use a low data rate to reduce the error ratio
  Serial1.begin(9600);
}

void loop() {
  // Values we want to transmit
  long timestamp = millis();
  int value = analogRead(1);

  // Print the values on the "debug" serial port
  Serial.print("timestamp = ");
  Serial.println(timestamp);
  Serial.print("value = ");
  Serial.println(value);
  Serial.println("---");

  // Create the JSON document
  StaticJsonDocument<200> doc;
  doc["timestamp"] = timestamp;
  doc["value"] = value;

  // Send the JSON document over the "link" serial port
  serializeJson(doc, Serial1);

  // Wait
  delay(5000);
}
Receiver program
This program receives the JSON document and extracts the values.
#include <ArduinoJson.h>

void setup() {
  // Initialize "debug" serial port
  // The data rate must be much higher than the "link" serial port
  Serial.begin(115200);
  while (!Serial) continue;

  // Initialize the "link" serial port
  // Use a low data rate to reduce the error ratio
  Serial1.begin(9600);
}

void loop() {
  // Check if the other Arduino is transmitting
  if (Serial1.available())
  {
    // Allocate the JSON document
    // This one must be bigger than the sender's because it must store the strings
    StaticJsonDocument<300> doc;

    // Read the JSON document from the "link" serial port
    DeserializationError err = deserializeJson(doc, Serial1);

    if (err == DeserializationError::Ok)
    {
      // Print the values
      // (we must use as<T>() to resolve the ambiguity)
      Serial.print("timestamp = ");
      Serial.println(doc["timestamp"].as<long>());
      Serial.print("value = ");
      Serial.println(doc["value"].as<int>());
    }
    else
    {
      // Print error to the "debug" serial port
      Serial.print("deserializeJson() returned ");
      Serial.println(err.c_str());

      // Flush all bytes in the "link" serial port buffer
      while (Serial1.available() > 0)
        Serial1.read();
    }
  }
}
Things used in these programs
Common problems
IncompleteInput
deserializeJson() returns IncompleteInput when the input JSON is truncated.
When applied to serial communication, this error is usually caused by:
- receiver reading too slowly and dropping bytes
- a timeout
In the first case, the sender writes bytes faster than the receiver reads them, filling up the receiver’s serial buffer until it overflows and drops incoming bytes. For example, this problem happens when the receiver is busy doing some other task when the sender is transmitting. It also occurs when the receiver logs incoming data at a slower rate; that’s why it’s crucial to get the “debug” serial running much faster than the “communication” serial.
You could solve this issue by increasing the serial buffer size; the details depend on each platform.
Arduino Leonardo
‘s default is 64 and can be changed by defining the SERIAL_RX_BUFFER_SIZE macro.
For ESP8266 and ESP32, the default is 256 and can be changed by calling setRxBufferSize().
In the second case, the sender writes bytes slower than the receiver expects, so the read times out.
Usually, this problem causes an EmptyInput error, but there are a few situations where it could return IncompleteInput.
In this case, you can solve the problem by increasing the timeout or by polling Serial::available() before calling deserializeJson().
InvalidInput
deserializeJson() returns InvalidInput when the input JSON document is incorrect.
This problem is often due to errors in serial communication. These errors come from:
Clock skew
Clock running at different speeds is a frequent problem when using different hardware on each side of the link (for example, an AVR and an ESP8266). If the sender is too fast, the receiver will occasionally receive phantom characters; if the sender is too slow, the receiver will sometimes miss a character.
Clock accuracy is another problem of SoftwareSerial; that’s why you should always prefer hardware implementations.
You can mitigate this problem by reducing the baud rate, but you’ll never be able to eliminate the errors completely. If you need reliable serial communication, you must detect the errors (with a checksum, for example) and resend the data when required.
Electrical noise
Any electric wire acts as an antenna; the longer the wire, the stronger the effect. This antenna picks up every electromagnetic field in the environment, which induces a current in the wire. On long wires, this current is strong enough to introduce errors in the transmission.
You can mitigate this problem at the hardware and software levels.
At the hardware level, you can replace the wires with a coaxial cable: the shielding will prevent the inner wire from acting as an antenna.
At the software level, you can:
- reduce the baud rate
- use error-correction code
- add error detection
Reducing the communication speed always improves the error ratio but is rarely enough.
Error-correction codes (ECC) are a way of transmitting data with redundant information that allows the receiver to fix most of the errors. The most basic error-correction code is Hamming(7,4), which transmits 7 bits for every 4 bits of actual data. In other words, it adds 3 bits of redundancy for every 4 bits that you send. The magic with this code is that it can correct any 1-bit error in the 7 bits.
The simplest way to implement Hamming(7,4) on Arduino is to use the HammingStream class from the StreamUtils library:
HammingStream<7, 4> eccSerial1(Serial1);
Now, you can use eccSerial1 in place of the original Serial1; it will automatically encode and decode the information.
As Hamming(7,4) only transmits 7 bits of data, you can safely downgrade the serial link from 8 to 7 bits.
You can do this by passing SERIAL_7N1 as the second argument of Serial::begin().
This feature is not supported by SoftwareSerial, which is yet another reason to avoid it.
Error-correction codes are very powerful, but they’ll never eliminate errors completely. For example, Hamming(7,4) can only fix a 1-bit error, so if two or more bits are swapped, it will not fix them. To get more confidence in the integrity of the received data, the ultimate solution is to add an error detection scheme, like a checksum.
StreamUtils is a powerful library that deserves more attention. Please give it a star to spread the word.
Voltage mismatch
Not all microcontrollers use the same voltage for the serial port. Some use 5V logic; others use 3.3V; the table below shows the values for the most common development boards:
| Board | Voltage |
|---|---|
| Adafruit Circuit Playground Express | 3.3 V |
| Adafruit Feather 32u4 Bluefruit LE | 3.3 V |
| Adafruit HUZZAH | 3.3 V |
| Adafruit Metro Mini 328 | 5 V |
| Arduino Due | 3.3 V |
| Arduino Leonardo | 5 V |
| Arduino M0 | 3.3 V |
| Arduino M0 Pro | 3.3 V |
| Arduino Mega 2560 R3 | 5 V |
| Arduino Micro | 5 V |
| Arduino MKR FOX 1200 | 3.3 V |
| Arduino MKR GSM 1400 | 3.3 V |
| Arduino MKR NB 1500 | 3.3 V |
| Arduino MKR Vidor 4000 | 3.3 V |
| Arduino MKR WAN 1300 | 3.3 V |
| Arduino MKR WAN 1310 | 3.3 V |
| Arduino MKR WiFi 1010 | 3.3 V |
| Arduino MKR ZERO | 3.3 V |
| Arduino MKR1000 | 3.3 V |
| Arduino Nano | 5 V |
| Arduino NANO 33 IoT | 3.3 V |
| Arduino Nano Every | 5 V |
| Arduino Tian | 3.3 V |
| Arduino UNO | 5 V |
| Arduino UNO WiFi | 5 V |
| Arduino Yún | 5 V |
| Arduino Zero | 3.3 V |
| diymore ESP32 CAM | 3.3 V |
| Espressif ESP32-WROVER-KIT | 3.3 V |
| HiLetgo ESP32 Camera Module Fisheye | 3.3 V |
| KeeYees ESP32-CAM | 3.3 V |
| LoLin D32 Pro | 3.3 V |
| M5Stack Fire | 3.3 V |
| MakerHawk ESP32 Camera | 3.3 V |
| Nucleo-32 | 3.3 V |
| SparkFun RedBoard Turbo | 3.3 V |
| Teensy 2.0 | 5 V |
| Teensy 3.2 | 3.3 V |
| Teensy 3.5 | 3.3 V |
| Teensy 3.6 | 3.3 V |
| Teensy 4.0 | 3.3 V |
| Teensy 4.1 | 3.3 V |
| Teensy LC | 3.3 V |
| TTGO ESP32 Camera | 3.3 V |
| TTGO ESP32 WROVER | 3.3 V |
| uPesy ESP32 Wrover DevKit | 3.3 V |
If you need to wire two devices with different voltages, you need a logic level converter.
SoftwareSerial
The AVR implementation of SoftwareSerial is notoriously unreliable 😱.
The main problem is that it disables interrupts when sending data, which causes many issues like dropping incoming bytes on the regular Serial.
You may consider the following alternative libraries, but none of them is perfect:
Again, the best solution is to use a board with several UARTs, such as:
| Board | Extra ports |
|---|---|
| Adafruit HUZZAH | 1 |
| Adafruit HUZZAH32 | 2 |
| Arduino Due | 3 |
| Arduino Leonardo | 3 |
| Arduino Mega 2560 R3 | 3 |
| Arduino Micro | 1 |
| Arduino MKR FOX 1200 | 1 |
| Arduino MKR GSM 1400 | 1 |
| Arduino MKR NB 1500 | 1 |
| Arduino MKR Vidor 4000 | 1 |
| Arduino MKR WAN 1300 | 1 |
| Arduino MKR WAN 1310 | 1 |
| Arduino MKR WiFi 1010 | 1 |
| Arduino MKR ZERO | 1 |
| Arduino MKR1000 | 1 |
| Arduino UNO WiFi | 3 |
| Arduino Yún | 3 |
| Arduino Zero | 1 |
| Espressif ESP32-WROVER-KIT | 2 |
| HiLetgo ESP32 Camera Module Fisheye | 2 |
| LoLin D32 Pro | 2 |
| M5Stack Fire | 2 |
| Nucleo-32 | 2 |
| Teensy 1.0 | 1 |
| Teensy 2.0 | 1 |
| Teensy 3.0 | 3 |
| Teensy 3.1 | 3 |
| Teensy 3.2 | 3 |
| Teensy 3.5 | 6 |
| Teensy 3.6 | 6 |
| Teensy 4.0 | 7 |
| Teensy 4.1 | 8 |
| Teensy LC | 3 |
| Teensy++ 1.0 | 1 |
| Teensy++ 2.0 | 1 |
| TTGO ESP32 Camera | 2 |
| TTGO ESP32 WROVER | 2 |
| uPesy ESP32 Wrover DevKit | 2 |
Missing flush after error
deserializeJson() may return InvalidInput because it starts reading the input mid-stream.
For example, it can happen if your program calls deserializeJson() in a loop like so:
void loop() {
  if (Serial1.available()) {
    StaticJsonDocument<64> doc;
    DeserializationError err = deserializeJson(doc, Serial1);

    if (err) {
      Serial.println(err.c_str());
      return;
    }
}
The problem with this program is that, if deserializeJson() returns an error (such as NoMemory), any subsequent call to deserializeJson() will return InvalidInput. Indeed, deserializeJson() stops reading as soon as it encounters an error, so the remainder of the document is still in the serial buffer.
The solution is to flush the serial buffer any time an error is detected:
void loop() {
  if (Serial1.available()) {
    StaticJsonDocument<64> doc;
    DeserializationError err = deserializeJson(doc, Serial1);

    if (err) {
      Serial.println(err.c_str());

      while (Serial1.available() > 0)
        Serial1.read();

      return;
    }
}
Troubleshooting
To troubleshoot an InvalidInput error, start by displaying the JSON input.
The simplest way to do that is to use the ReadLoggingStream from the StreamUtils library:
ReadLoggingStream loggingStream(Serial1, Serial);
deserializeJson(doc, loggingStream);
This program will print to Serial every byte it receives from Serial1.
It’s crucial to have Serial running much faster than Serial1; otherwise, the program will read too slowly from Serial1.
For example, in the program above, we used 115200 bauds for Serial and 9600 bauds for Serial1.
